By now, everyone should be familiar with creating custom views in SharePoint 2010. It is a great way to speed up the process of finding the items or documents that you need without scrolling through pages of unnecessary content. For instance, I send reports on a weekly basis to several clients with information that I get from many different lists. All of the lists and libraries that I use have custom views that give me the exact content I am looking for.
When I first began to do these reports a few years ago, I was relatively new to SharePoint. I would spend hours filtering and scrolling through pages to find the information that I needed. It did not take me long to figure out that I could create a few simple views that would cut my time spent on these reports in half. I felt as if I had just cracked some secret code in the SharePoint world. These custom views would display my content in exactly the way I wanted, which made my job much easier and put a smile on my manager’s face.
Now I have set up a demo library and filled it with Microsoft Excel and Microsoft Word documents. Let’s create a custom view that will only display word documents so you can see how easy but beneficial it is to have these custom views. Let’s get started:
1. I will begin by opening my “Testing” library.
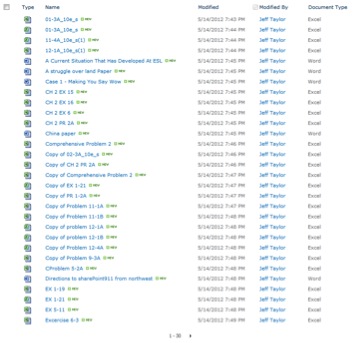
2. This library has both Microsoft Excel and Microsoft Word documents.
3. Notice that by default libraries have an “All Documents” view.

4. It is now time to clean this up and get organized.
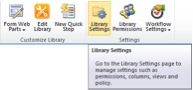
5. At the top in the “Library Tools” section I will click Library.

6. Once the ribbon has opened, under “Settings” I will click Library Settings.
7. Scroll to the bottom. Again you will notice that under “Views” there is only one view by default, which is the “All Documents” view.
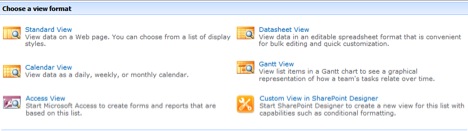
8. I will click Create View.
9. Notice all of the different choices that I can select when creating views. For the sake of simplicity, I am going to click Standard View.
10. I will now create a view to show all of the Word documents in my library.
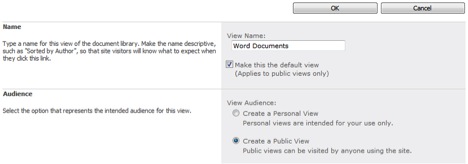
11. Under the name section, I will be descriptive but brief: Word Documents.
12. I can choose whether or not I want this to be my default view, and check this box.
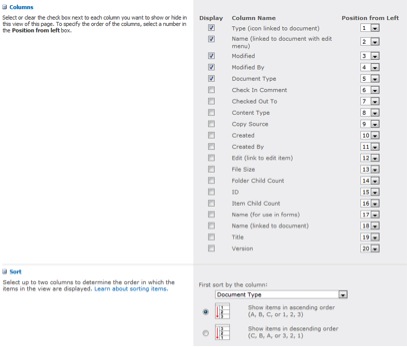
13. In the “Columns” section, the only additional column I will click is Document Type.
14. In the “Sort” section, I will sort by Document Type.
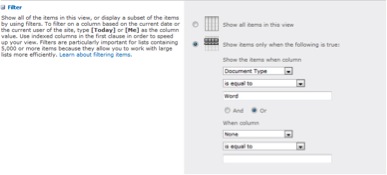
15. In the Filter section, I am going to check the box that says “Show items only when the following is true:”
16. Under “Show the items when” column, I will click Document Type.
17. I will leave the second drop-down as is equal to.
18. Then, in the last box, I will type Word.
19. Take notice of all the other settings I could change, but I will not be changing any of these in this example.
20. I will scroll to the bottom and click OK.
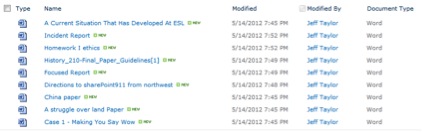
21. I am now taken back to my testing library, and I will be able see that the default view is “Word Documents” and only my Word documents are showing up here.
22. Not to worry, the Excel spreadsheets are not gone, they are just in my “All Documents” view.
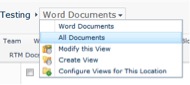
23. To switch views back to “All Documents,” I will click Word Documents at the top.
24. Then I will click All Documents.
25. All of my Word documents and Excel spreadsheets in this library are being displayed again.
26. I could simply change a few of these steps to create an Excel spreadsheet view just like my Word documents view.
This is just a simple example of what a custom view can do in your SharePoint2010 environment. You can see that within seconds I easily created a view that sorted all of my Word documents from my Excel documents. So now whenever I leave this library and need to come back for any reason, this will be the first view that I see. This could be extremely beneficial to you if you are constantly looking for documents. The best part is that there is no need to filter or sort manually; any word document added to this library from here on out will show in this view. So I advise you to start creating your own custom views to see for yourself.
Jeff Taylor is a consultant with SharePoint911, a Rackspace company.