One of the sessions I present at SPTechCon is entitled “Getting the Most Out of SharePoint Search,” and one of the challenging parts about doing a search presentation is that many of the demos I’d like to do simply take too much time. For example, if I wanted to show how users could search on their own custom fields, it would require that the audience to sit there while I run some indexes. This is no fun to watch, and I simply don’t have enough bad jokes to keep an audience entertained for more than 30 seconds at most.
I’m writing this as a way to provide the steps required to do that demo for creating your own custom fields.
Quick Summary:
1) Create a field in a list or document library.
2) Make sure some items in the list or library have the field and it is filled out.
3) Run an incremental crawl to add the field into the index as a crawled property.
4) Create a managed property.
5) Run a full crawl.
6) Wait patiently.
7) Enjoy searching on your new managed property.
Longer Explanation
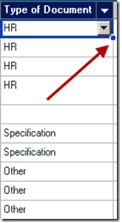
1) The first step is to create a list or document library with at least one custom field in it. In my case, I’ve added a column to an existing list called “Type of Document” and made it a Choice field.
This was a very deliberate choice: In larger organizations, a Managed Metadata field has a lot of benefits for this type of scenario, but in my case I’m trying to move this along as quickly as possible. Managed Metadata fields can’t be updated in the datasheet view. Choice fields can be edited in the datasheet view. We need the fields to be filled with information (and, ideally, I’m trying to make the process as painless as possible) so we can then index it… But let’s not get ahead of ourselves.
2) Make sure you’ve got some items in the list or document library and you’re using the datasheet view to populate the values of your new field. You should be able to select a value and then, just like in Excel, click the box in the bottom right corner and drag down to fill the cells below:
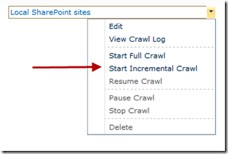
3) Once you’ve filled in some data, the next step is to go to your Search Service Application in Central Administration (Application Management > Manage Service Applications > Search Service Application) and kick off an index. You can do this by clicking Content Sources from the left navigation. Then click the dropdown next to Local SharePoint Sites and select Start Incremental Crawl (this assumes you’ve already done a full crawl at some point; if not, then click Start Full Crawl).
On my dev server (without much content), an incremental crawl took anywhere from 2.5 minutes to almost 6 minutes. This is exactly why I don’t demo this live!
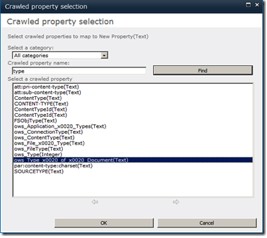
4) Once it completes, click on Metadata properties from the left navigation bar. Then from the toolbar across the top click Crawled Properties:

5) To quickly find my new custom column, I entered “type” into the search box at the top and hit the green arrow. There were several results that came, but the one I’m looking for is called ows_Type_x0020_of_x0020_Document(Text). We aren’t really doing anything special in this step—just proving that our new column got indexed.
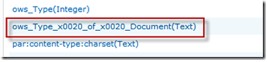
I know it has a strange-looking name. This is the internal name for the field, but we are going to take care of that in the next step.
6) The next thing we are going to do is create a Managed Property, which will take care of that strange-looking name for the crawled property. From the toolbar at the top, click on Managed Properties and then New Managed Property.
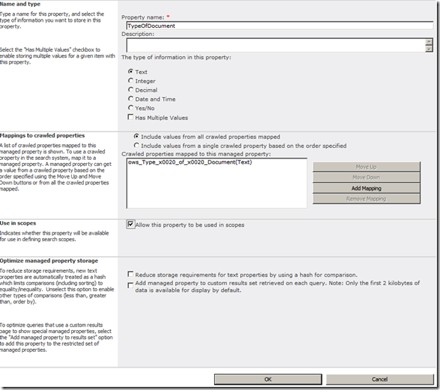
From the New Managed Property Page, fill in the following information into the fields:
Property name: TypeOfDocument
Type of information in this property: Text
To map our column, press the Add Mapping button, and in the Crawled property name field, enter “type” and press Find. This is about the same process you’d have followed in step 5. Once you’ve located the field, select it and press OK.
You’ll see that the field mapping has now been added to the Mapping to crawled properties field on the New Managed Property page. Next, place a check in the box to Allow this property to be used in scopes. Then press OK. The page should look like this: