In SharePoint and SharePoint Online with Office 365, permissions have always been one of the major pain points when it comes to end users, training and adoption. The user interface on the permissions screens, and the complexity revolving around inheriting or breaking permissions, are in many cases quite challenging to grasp.
I deal a lot with small companies, and many of them use SharePoint sites for just the bread and butter: team collaboration. Here’s a very simple and common setup:
• A department has a collaboration site just for themselves.
• A project team has a collaboration site just for each project.
• All of the members of that team or project need to be able to add/edit/delete anything on that site.
Since this scenario is so common, I thought I’d share my easy permissions governance plan that I use in these cases. Again, this is geared toward small companies and simple collaboration sites.
If you’re following the steps below, I recommend that you try this out on a test site first, and not test out these steps on a live site that people are using. Since this is a test site, I’ll create the names of the groups as “test site owners” and “test site members,” but yours will be called “name of your site Owners,” etc.
In the following steps, here is an overview of what will be accomplished:
• Each site will have one or two (preferably two) owners, who will be able to work on content and the Web part design. They will also be able to edit the list of site members.
• Each site will have a group of members who are contributors and can add, edit and delete content.
• FULL CONTROL: Someone who is fully trained and knowledgeable about the intricacies of SharePoint permissions will be given full permissions on sites. This can be the “SharePoint guy” or the IT department. It is not necessary to have any server administration or development skills for this role, but this person does need to understand SharePoint site management and permissions. Decide a SharePoint group or an AD group of people who will be given this responsibility. This is necessary because the SharePoint site will not allow you to not have at least one entity with full permissions. Keep in mind that even though that person or group may already be a site collection administrator, it will also be necessary to give them full control on the site.
In my experience, on simple collaboration sites, the only reason that full control is needed is for permissions management. We are going to allow the site owner to manage the list of site members, but will NOT give them full control permissions on the site.
1. Create your test site. For the ease of these instructions, just let it inherit permissions at first. (SharePoint on premise and SharePoint Online with Office 365 have slightly different interfaces I’m trying to account for.)
2. Click Site Actions and choose Site Settings.
3. Click Site Permissions.
4. Click the Stop Inheriting Permissions button in the ribbon. Click OK to the notification message.
5. In the toolbar, click the Create Group button.

#!
6. Type the name: Test Site Owners.
7. Scroll down to the section marked “Give Group Permissions to the site”. Check the box next to Design. Click Create.
8. At the top of the left navigation, click the word Groups.
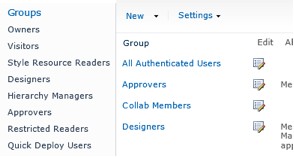
9. Click the New button.
10. Type the name: Test Site Members.
11. In the Group Owner box, type Test Site Owners. (This is the name of the group you created at step 6.)
12. Scroll down to the section marked “Give Group Permissions to the site”. Check the box next to Contribute. Click Create.
13. In the breadcrumb trail at the top of the screen, click Site Settings.

14. Click Site Permissions.
15. Read the bullet point above, called FULL CONTROL. In my example, the list of full control owners is called “Owners”. Take a look at the right column and find which items have Full Control next to them. Most likely, you are in one of these groups, since you were able to create this test site. Decide which one of these to leave in place.
16. See the list of checkboxes down the left next to all of the people and groups? Check the very top box, which will check all of the boxes at once.
17. Uncheck the following: Test Site Members, Test Site Owners, and your group that you decided upon at step 15. Notice in this screenshot that my name is listed here, but since I know that I’m in the Owners group, I can delete my user account from this list.
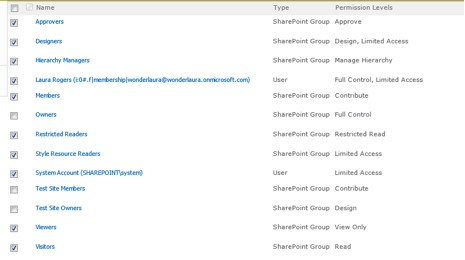
18. Click the Remove User Permissions button. Now see the very simple list of site permissions:
#!
19. Make sure that the Site Owners can’t add any more site owners. The site owners will only be able to manage the site members list. Click the name of the Test Site Owners Group.
20. Click the Settings button and choose Group Settings.
21. In the Group Owner box, type the name of your full control owners group and click OK.

22. Click OK.
23. The last important step is to give the “owners” a way to manage the list of members. Since they do not have full control, they will not have a site permissions button in site settings. In the left navigation, click the Test Site Members group.
24. Click the Settings button, then choose Make Default Group. Look at the address bar in the browser and see that the address will end with something like MembershipGroupID=
Select the whole URL from the address box and copy it to your clipboard.
25. In the breadcrumb trail at the top, click Site Settings. Under Look and Feel, click Navigation. (The interface here varies for different SharePoint versions and features, so if you don’t see Navigation, click Quick Launch.)
26. Scroll down and select Current Navigation. Click the Add Link button.
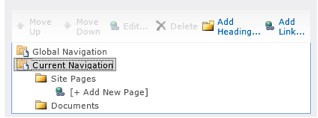
27. For the Title of the new link, type Edit Site Members, and in the URL box, paste your URL from the clipboard. If you have the enterprise version of SharePoint, you can additionally type the Test Site Owners group name in the audience box. This way, only people in that group will see the new link. Click OK.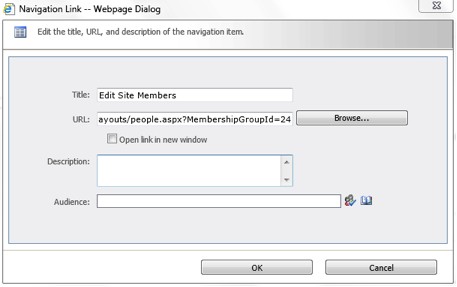
28. On the Navigation Settings page, click OK.
Once you hand over this new site to the new owner(s), they can click Edit Site Members and start adding the names of the people who will need to use this site.
#!
Recap
The IT person or group is given full control to each team site. The IT person or group is the owner of the SiteName Owners group. The SiteName Owners group for each site is given Design permissions. The SiteName Members group for each site is given Contribute permissions on the site. The SiteName Owners group is the owner of the SiteName Members group.
The main goal of the setup that I have described is simplicity. The idea here is not that I’m mean and want to keep control of everything. The idea is that in eight years of working with SharePoint, this is what I see happen frequently:
A site is created for a team or project, with several owners with full control. These newly appointed site owners are usually the people in charge or that team or project. Often, when these curious owners are clicking around in Site Settings, there are many (way too many) options presented to them. Sites get deleted, settings get messed up, and in general it takes IT longer to clean up the mess than it would have to just not give them full control of the site.
Alternately, the company’s governance policy may have required site owners to go through some SharePoint training when they were first deemed the owner of the site, which is awesome. But, after several months, if they don’t use SharePoint that often, they forget some things, or remember them incorrectly and don’t have/can’t find the written instructions.
Permissions are complicated, and I don’t blame those poor site owners for forgetting how to manage them. Don’t worry: With Design control on the site, these “owners” can do a lot. This is what Site Settings looks like to someone with Design permissions:

They can manage lists and libraries, add and edit Web parts, modify the site’s theme and navigation, and even manage the site columns and content types. Usually this is enough.
If there is still something missing here that you would like the owners to be able to do, another common variation that I’ve done is to create a new, custom permission level and call it “Site Admin” or something. For example, if the site owner needs to be able to manage alerts, the custom permission level can have that setting.
Bonus: The enterprise version of SharePoint has a Web part called Contact Details. You can insert this on the home page of each site and select the name of whomever the team lead or site owner is in the Web part settings. This way, people who go to this site will quickly see who the person in charge of the site is.
Further reference material
Permissions Management
Introduction: Control user access with permissions (there are also several great links on the right side of this page)
Managing Permissions
Laura Rogers is a consultant with SharePoint911.


