In the SharePoint 2013 Preview and in the Office 365 Preview, there are some great hidden gems when it comes to working with video content. In this article, you will learn about adding and managing video content, and several ways to display that content on pages in SharePoint.
Where do I put my videos in SharePoint?
The first step is to create an asset library. From there, videos can be uploaded to the library just as you would add documents to a document library. Some interesting things happen behind the scenes each time a video is uploaded. Each video gets its own special page that displays more information about the video, as well as associated content. This screenshot shows a video called “Content Search” that has been uploaded, and the properties of it are displayed on the page as well.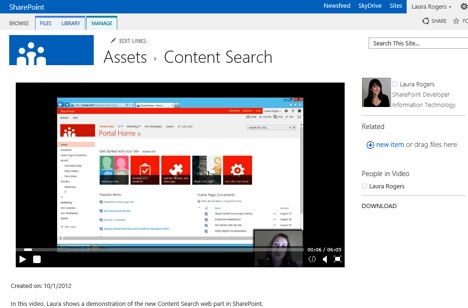
How do I manage the properties of the video page?
After a video has been uploaded, click on the name of the video in the library, and then go to the Manage tab. Here are the important things to notice:
• Edit Properties – The coolest thing on this screen (to me) is the ability to capture a video thumbnail right out of the video. The owner field defaults to the name of the person who uploaded the video, but it can be changed. There are also some checkboxes to indicate whether you want users to have the option of downloading your video or grabbing the embed code for it. You can also select the names of the people who are shown in the video.
• Permissions – Decide whom you want to share this video with, if it needs to be different than the permissions for the library itself.
• Manage Video Renditions – This setting is great because it allows accommodation for end users who may be on slower network connections. Different versions of the video with different bitrates may be uploaded here. When watching the video, end users will see a graph-like icon on the video that will let them switch between renditions.
Here is a screenshot of part of the Edit Properties screen: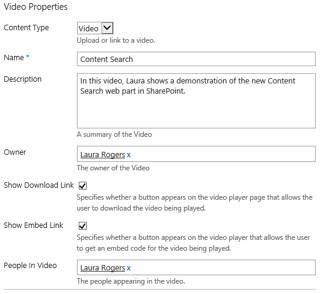
• Related items – Another cool new feature that you may have noticed in the first screenshot is the ability to include related items. For example, if my content search video has a Word document or two associated with it, those documents can be added as related content. Since each video has its own document set in here, those documents are contained within its document set.
Everything in this article so far has been confined to the library itself. What about situations where videos need to be displayed in Web Parts on other pages in the site? There are a couple of out-of-the-box Web Parts that are great at this:
Media Web Part – This Web Part has been around since SharePoint 2010. Simply add it to a page, then use the Media tab at the top to configure its properties, such as the video to look at and whether to play it automatically.
Video as page content – Also, on publishing pages and wiki pages, media content can directly be inserted into content areas, and the configuration of the media itself is the same. When editing these types of pages, the Insert tab will contain an option for video. You can navigate to your SharePoint content, or use the embed code for any video from SharePoint or the Internet.
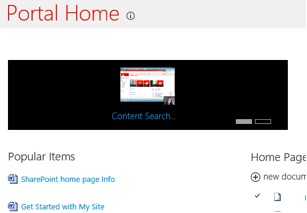
Content Search Web Part – This is a new Web Part in SharePoint 2013, along with a whole category of Web Parts called Search-Driven Content. Video content can be displayed in this Web Part, and there is a Web-Part setting called Control, which has a setting called Slideshow. Videos can be displayed in this slideshow style so that they can be scrolled through in a pretty graphical interface. This screenshot is of a Content Search Web Part on the home page, which shows one video at a time and has two total videos: