I see it all the time: SharePoint content owners create sites using images that are much too large for Web consumption. It’s easy to understand why this happens. Sally Site-Owner gets a photo or image from the marketing department that was created for print or some other high-resolution format. Sally uploads the image to SharePoint and simply resizes its height and width using the ribbon controls to make the page look nice. Of course, resizing an image in this way doesn’t actually make the file size any smaller, and now end users (potentially even users on slow or metered mobile connections) will have to patiently download the large image to see the page.
SharePoint 2013 answers this problem with a SharePoint Server publishing feature known as image renditions. With image renditions, you can add images to a library and easily add them to pages using various predetermined widths and heights without downloading the full-sized image.
To use image renditions, you need a few things:
• A SharePoint Server site with the publishing features activated
• A picture library to test in. You can use the default Images library, or you can create a new picture library from Settings > Site contents > Add an app
• Blob Caching needs to be turned on in your web.config file (so you will need access to the server SharePoint is installed on)
I’ll assume the first two are pretty easy to figure out without me going through the steps. To turn on Blob Caching, simply navigate to the web.config file for your SharePoint site on the physical server. It is usually located in a directory similar to C:inetpubwwwrootwssVirtualDirectories80. You can use IIS to help find the directory if you want. Open web.config in an editor like Notepad (when you hit Save, IIS will reset the SharePoint site, so make sure not to do this on production during peak hours) and use Control-F to find the first instance of “<BlobCache”. In this line, you will see enabled=”false”. Simply change this to “true” and hit save.
#!
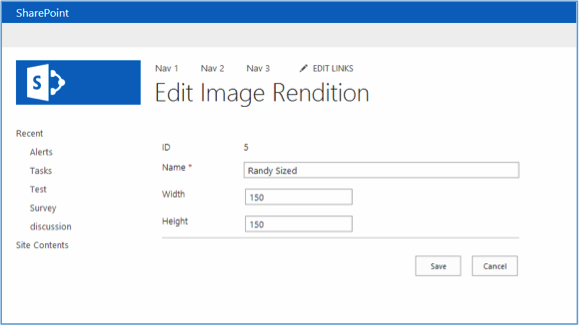
Now you can create your own image-rendition sizes from Settings > Site settings > Look and Feel > Image Renditions. There should be a few predefined sizes you can use. To create your own, simply click Add new item, enter a name, width and height, then click Save. Now, when you add images to a picture library, you will have a rendition that matches that size that you can work with.

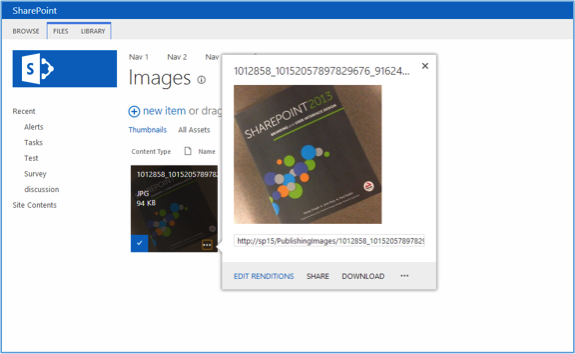
To work with the image renditions, navigate to your picture library and upload a picture. Once the picture thumbnail shows in the library, hover over it, click the ellipsis in the bottom-right, and then click Edit Renditions.

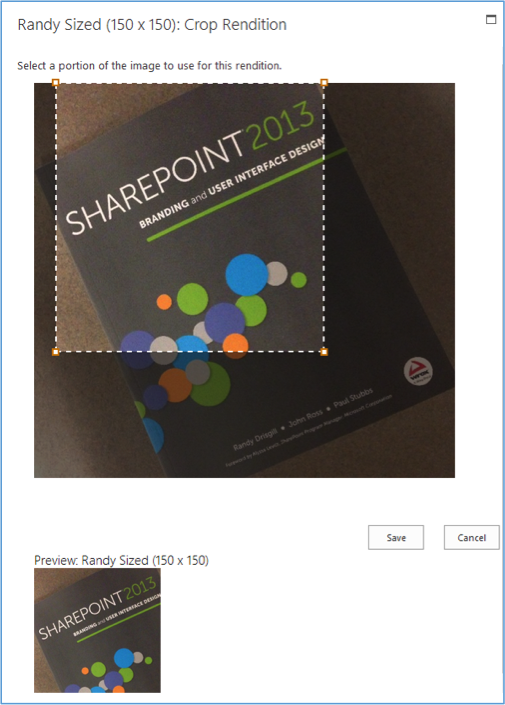
From here, you will see a list of all the renditions that are available, with images already created for each size. You can edit the sizing and cropping of a rendition from Click to change. This will show you a dashed box that is constrained to the size of the image rendition, and you can move and resize photo accordingly to show the image in the best possible way. This can be useful for showing faces or text in smaller sizes.

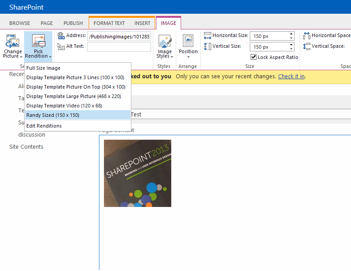
With your image renditions set up and configured, now you can select from the different size options when you insert an image into a publishing page. After editing a page and inserting the image, from the ribbon you would just click the image tab and then choose from the Pick Rendition dropdown.

Because an image rendition is being used, the image in my example is actually a 150px by 150px file and should download quicker than a full-sized image. Pretty cool, right? What if you want to reference the image rendition directly using code or without the ribbon? Well that’s pretty easy: You can pass URL parameters to the image for either the RenditionID (the number in the image rendition list order: 1, 2, 3, etc.), or for width and/or height.
For example, in my sample above, the raw image URL in SharePoint was:
http://sp15/PublishingImages/1012858_10152057897829676_916248115_n.jpg
If I want to load the image rendition for 304×100, I can reference the image like this:
http://sp15/PublishingImages/1012858_10152057897829676_916248115_n.jpg?Width=304&Height=100
You can reference an image with just the height or width also, but if there are multiple matching renditions, the first will be returned.
Image rendition is a pretty handy feature for helping content authors create images that are sized appropriately for the Web. Oh hey, did I forget to mention that image renditions work with videos also? So be sure to try that out as well!
Randy Drisgill is a consultant with SharePoint911, a Rackspace company.


