In Parts 1 and 2, I talked about:
• Redirecting users to the drop-off library
• Auto-foldering and partitioning based on the size of the library
• Rule management
In this last segment, I am going to talk about the dreaded permissions question as well as taking the Content Organizer one step further and leverage “Send to connections.”
Library permissions
One common question about the Content Organizer concerns the idea of document, library and/or folder permissions. With all these files flying around my site or sites, how do we ensure people have the correct permissions? Possibly more importantly, how do we ensure that people are not uploading files to document libraries where they don’t have permissions?
Well, the short and potentially unfortunate answer is you don’t have to worry about it. SharePoint “assumes” that when you are setting up the rules that route documents to specific libraries, you always want those documents going there whether or not the user uploading them has permissions. This means the user uploading the document does not need to have permissions on the final destination of the document being uploaded. Let’s take an example:
User A uploads document A.docx to document library A, to which users A has permissions, in a site where the Content Organizer is active and with rules all set up. But the rules say that A.docx should not be in document library A, it should be in document library B. So it routes that document to library B. However, user A does not have permissions in document library B to write files to it. This does not matter, because SharePoint assumes that when you are specifying rules, that this is what you want to happen no matter what the permissions are.
This boils down to the need to plan your rules carefully and ensure that you are also planning good permission architecture so this does not come back to bite you.
Send to connections
Let’s move onto happier thoughts and talk about “Send to connections.” This is a great way to involve your users in managing content. “Send to connections” allows your users who happen upon an out-of-place document to say, “Hey, this document does not belong here; it belongs over there.” A good example I have come across is that of records. If I have a user browsing a document library, and he happens upon a file he would expect to be a record, he can say, “Send it to the record center.”
At the bottom of your Content Organizer settings screen, you will see a Web service URL that is specific for that site. (Remember, all content organizer settings and rules are site specific).
You can take this Web service URL, and in Central Administration, create a “Send to connection” by going to Central Administration > General Application Settings > Configure Send to Connections.
Here, I can create the “Send to connection” for the site I am concerned with sending documents to. 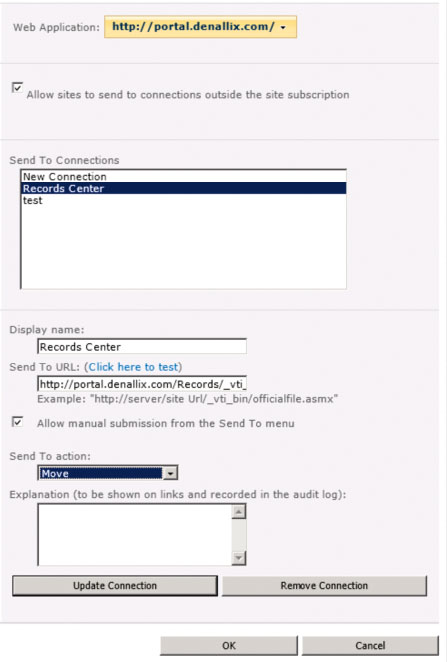
After I do this, users will now have an additional option on each file as shown below: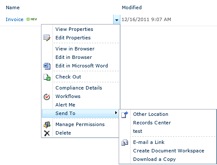
This can be a great way to empower your users to help manage content.
As you can see from this three-part series, the Content Organizer can be a tremendous asset to your SharePoint environment, but like all things SharePoint, you have to know a few things and plan out how you should use them. Happy Content Organizing!
Chris Geier is the community manager for K2, and is a participant in, and advocate for, the SharePoint community. He is a 15-year veteran of the technology industry and specializes in all things Microsoft. He was introduced to SharePoint in 2001 while working for Microsoft services.