Having a continuous integration and deployment (CI/CD) pipeline for a project is almost mandatory nowadays. With cloud-native software in general and Kubernetes applications in particular, developers and operators face new challenges: How do I run my end-to-end tests in a Kubernetes environment? How can I automate the process of testing and releasing my application for different platforms and Kubernetes versions?
This post will walk you through the different steps needed to set up in a CI/CD system when working with open-source projects, so you and your users can benefit from community contributions, while maintaining the best quality possible in the code.
Cloud-native applications have several interesting characteristics that are very convenient in an environment like Kubernetes. First of all, they are based on multiple microservices. When updating a microservice, you usually want to ship it and use it as quickly as possible. To be confident about doing this, you need to run tests. Unit tests are easy, but the challenge with microservices comes with the need to test the interaction between them, to be sure you are not introducing regressions. That’s when end-to-end tests come in handy.
If you are working on an open-source project, you will probably want a community to support it. Having people submit new issues and pull requests is critical for medium- and large projects. While you want to keep contributions coming from new users, you also want their code to maintain the same quality as that in the project. This means you want their code to run the same battery of e2e tests, even before you look into it. This implies that you will end up running untrusted code in your CI system, so you will need to be prepared for this.
Finally, once new changes are in the master branch, you may want to release a new version of your application. This may happen several times a month or even several times a week. Therefore, the process of creating new releases should be as automated as possible, enabling you to create releases as often as you want. If your project is using Kubernetes, the easiest (and most common) way to make the application available to your users is through a Helm chart. It’s also important to keep the maintenance of those charts in the automated pipeline to avoid disruptions.
Fortunately, it is possible to use open source and free tools to achieve an end-to-end scenario, from developing your code, testing changes, and publishing new versions.
The tooling
Relevant tools include:
- GitHub for storing code.
- Any CI system to run the pipeline. Note that any CI is valid here as long as it has support for running Docker containers.
- A Kubernetes distribution for deploying the application for the e2e tests. In particular, you can use:
- Kind to run e2e tests and untrusted code. The good thing about kind is that it allows you to run Kubernetes just having a Docker daemon running. Also since you will be running kind in CircleCI, you don’t need to worry about compromising your infrastructure.
- GKE to run e2e tests in an environment that is closer to a production deployment. Note that these tests will be running in your GKE account. You will only want to do this when the code has been properly reviewed. Again, any managed Kubernetes provider is a good option here as long as it mimics how the application can be deployed in production.
The application
In the example below, I’ve have applied multiple techniques to set up the CI/CD of a real-world app Kubeapps, which is an open-source project. It is deployed in Kubernetes and it is hosted in GitHub. It’s also available for users as a Helm chart, so it makes a perfect fit for the use case I want to demonstrate.
The continuous integration and deployment journey
Our CI pipeline will be composed of three different stages and will look something like this:
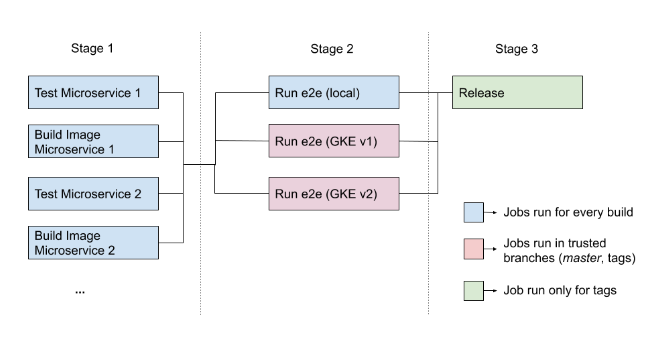
See the configuration for a fully working example here.
Stage 1 – Unit testing and image building
The first set of jobs will execute the unit tests and will generate the Docker images for each one of the microservices. These jobs can be run in parallel. You can do so for as many microservices as you have. Note that all the microservices are sharing the same Git repository. This is useful for scenarios in which a new feature requires changes in several services. That way you can have all the related changes in the different microservices in the same development branch.
If all those jobs succeed, then go to the next stage and use the generated images to run your end-to-end tests.
One particular thing to notice is that you won’t be able to push new Docker images when working with PRs since external users won’t have the credentials needed to push to the project registry. To be able to share the images for stage 2, you need to store them as files.
To store the image my-repo/my-image in the folder images, execute the following:
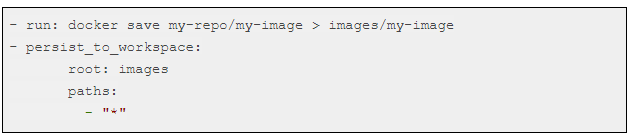
But, in the case when you actually have credentials, you want to push your images to a registry, for example in the master branch or when running a release job. That’s something easy to achieve, just log in with your registry account and push a development tag for your image.
Stage 2 – E2E tests
At this point, you have Docker images for all the microservices with the new changes. To run your e2e test, you need to perform several steps.
Spin up a Kubernetes platform
This will be kind for PRs and GKE for trusted code (either master or a release tag).
Creating a cluster with kind is quite easy, just download the latest version and run a command:

Creating a cluster in GKE (or any other managed Kubernetes system) is a bit more complicated. You need to check if you have the required credentials, check if the cluster has not already been created, and wait for the cluster to be healthy before doing anything else. You can take a look at the script we use to ensure that you perform the different steps.
To start the cluster, you will need to execute something similar to:

Where BRANCH is the Kubernetes major version (e.g 1.11), ZONE is the GCloud zone where you will create your cluster and CLUSTER is the name of the cluster.
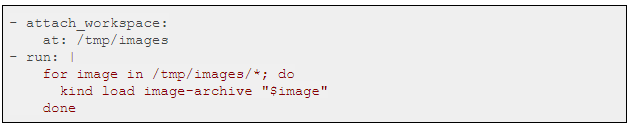
Load your images in the cluster
This is only needed when using kind, since in the GKE environment, the new images can be pulled from the Docker registry.
Since you stored the images in your workspace in stage 1, loading them is quite easy using kind:
Install your application using the new images
This step may vary a lot depending on the requirements of your application or the end-to-end scenario you want to run. In our case, we install the application using the Helm chart present in the repository, making sure we use the recently built images:

Run e2e tests!
Finally, you are ready to run your test. Depending on your project, you may want to run web browser tests, Helm chart tests, or bash tests… In our case, we use the Helm framework to run our tests. If you are curious, find the test script used in Kubeapps here.
Stage 3 – The release
The canonical way of creating a release in GitHub is to create a tag. Once a tag is created the CI will pick it up as a branch and will trigger the configured workflow. To specify a job that will be run only if there is a release, set a filter:
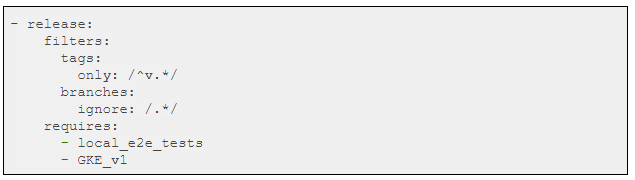
The above means that the job release will only be executed for tags starting with a “v” and only if the e2e tests succeed.
Now it’s time to publish images using a release tag and push them to the Docker registry so they can be used in the new chart:

Automating the chart release
At this point, the new images for the microservices are published, but there is still one final step to end the process. If you are using a Helm chart to distribute your application, you need to push a new version.
In our case, for triggering a Helm chart update, we just need to bump the version in the Chart.yaml file of the chart we host in the repository. In every build, we compare that value with the latest one published. If the local version is different, we trigger the upgrade process. Once a new version is discovered, we make sure that the chart contains the latest images and we push the new chart to a Helm chart registry.
To find the bash library that we use for all the operations related to updating a Helm chart, click here.
That’s it! With that, I have covered the whole process from adding new code to a project, running tests in a secure way, and publishing a new release.
To take away: Automate all the things!
When working on an open source project in a cloud-native environment, it’s important to:
- Automate the process of testing and deploying changes as much as possible.
- Run e2e tests! In a microservice world, just running unit tests is not enough.
- Run tests in different scenarios, in parallel. Running tests for a single platform (more if it’s a development platform) is risky. You want to test an environment that’s the closest possible to production.
- Provide the tooling to external contributors so they can submit code like you would.
If you have any questions, suggestions or proposals, contact the Kubeapps team on the #kubeapps channel on Kubernetes slack!
To learn more about containerized infrastructure and cloud native technologies, consider coming to KubeCon + CloudNativeCon Barcelona, May 20-23 in Barcelona.